

I know the problem you face. You’ve written a piece of music that uses orchestral samples, like strings samples for example, and it isn’t sounding anything like the Hollywood score you hoped it would…
So, how do you make your orchestra sound real?
I have listed 13 ways to make your orchestra sound real below. These items should be worked through in the order I have written them.
Why? Because the first 7 are about setting up your orchestral template and the last 7 are focused on the writing and production stage.
- Imagine what your music would sound like
- Know the instruments’ ranges
- Utilise different samples
- Use different articulations
- Create instrument groups
- Position the instruments like a real orchestra
- Add reverb
- Layer different reverbs
- Utilise modulation and velocities
- Play around with quantisation
- Layer a live recording
- Automate
- Don’t chase perfection
Right, now that you know the overall structure let’s dive into the details and make your orchestra sound like the real deal.
Imagine what it would sound like
The first step to making your orchestra sound real is to step away from the computer and think about how you want those parts to sound.
Here are some great questions to ask yourself that will really help you imagine:
Do the parts swell in volume?
Are there any notes that are louder than the rest?
Do you want any gaps or rests in between the notes?
Once you have answered these questions you will get a better sense of what you need to do to make these musical lines sound “better”.
Then it’s simply a case of you adjusting the velocities and modulation to match the sound you have imagined.
Your composition doesn’t always have to mimic what live musicians would do. You just want the piece to feel like it has life and movement to it.
It’s the same situation with drones; you want to give them movement so they suddenly feel alive.
There are many well-known composers who are big advocates of this approach. Gyorgy Ligeti and Hans Zimmer are the two biggest that spring to mind.
They both advise you to imagine the piece first. This will give you a sense of the piece’s length and also stop you from relying on muscle memory too - using the same formula or templates to write music with.
Know the ranges of your instruments
I’m afraid that this step is one of those boring ones, but it is very helpful.
When I was starting out I spent a great deal of time studying orchestration. This involved studying music from the classical canon.
I would buy the sheet music and listen to the music whilst “reading” the scores.
What this showed me over time was that some instruments were better at some things than others. And that all instruments have certain pitch ranges where they sound amazing and some pitch ranges where they don’t sound so good at all.
Take the range of the Violin for example, it has a huge range of just over 5 octaves.
I’m not going to dive into the ranges of all the instruments, as I think it is important for you to take the time to study the sounds of the orchestra and see what you think works best.
This is after all about your music. Plus if I did this would be a super long blog post!
Not all composers and orchestrators agree on the “best” sounds for each instrument, that's why we get so many beautiful and varied pieces of music.
Use the ranges as a guide, not a rule, and create music that lights you up. Even if it breaks the rules.
This book on orchestral technique was my first foray into orchestration and learning the ranges.
Utilise different samples
When I was starting out as a composer I was under the impression that the reason I wasn’t winning jobs was that I didn’t have access to a real orchestra.
I let myself believe this for quite some time.
Until one day I was tasked with producing an orchestral session for a massive TV advertising campaign.
I was to work with the composer to prepare all the scores for recording. I would then work with the ‘fixer’ to make sure that all the orchestra we needed was there and had the scores they needed.
It was very exciting and I felt a huge sense of pride. I felt that I had “made it” because I was working with an orchestra in a well-known London recording studio.
It was really cool.
We had string, brass and woodwind sections. The entire ensemble was about 30-40 musicians if I remember correctly. So not a massive orchestra by any means but they sounded amazing!
I was recording with a real orchestra. I had made it…or had I?
On the day of recording, I walked into the studio to find all the musicians present and warming up. I walked into the booth to find not just the engineers and the fixer but also the head of the publishing company I was working with, the advertising executives, and the client.
I had to get into performing mode!
10 hours of recording later I was downloading the recordings to take home and mock up the demos for the agency.
I did not expect the feedback that I got.
“This doesn’t sound big enough, can you make it sound bigger?”
To my surprise, the clients had become so used to the sound of massive sampled orchestras, which meant that the real thing didn’t cut it!
In the end, I still had to layer samples because they sounded so good.
What this means for you is that you must consider each sample library as a slightly different shade of the same colour and sometimes layering different libraries creates a better and more realistic sound.
So load up some of your favourite libraries.
Use different articulations
This does involve more studying on your behalf because you have to find out what the articulations of each instrument are and how they can be used.
To save you time, think in terms of long or short notes.
This is the start of your articulation journey.
Do you want the instrument to play long notes or short notes?
That’s the first step. Once you know this you can then explore how each instrument plays either a long or short note.
This is when it starts to get fun; how long or short? How loud or quiet? How fast or slow?
Each of these questions will mean it might be easier for the player to use a slightly different articulation and create a slightly different sound.
This list of musical articulations will get you started nicely.
Once you know the articulations you want to use you can start to load those samples into your DAW.
Create instrument groups
Once you have loaded up your instruments into your DAW the next step is to group them.
This means that you put all the strings into one group, all the brass into one group, etc. Keep going, keeping all your instruments in their own groups.
For this purpose, I will often use track stacks in Logic.
The reason we do this is twofold: It means we can process those sections together more easily, and the stems or track outs are all ready for mixing and mastering
Once you have done this you are ready for the next step.

Position your instruments as if they are in a real orchestra
When you see an orchestra live. All the musicians sit in certain positions according to the most recent orchestral layout.
This looks something like this:
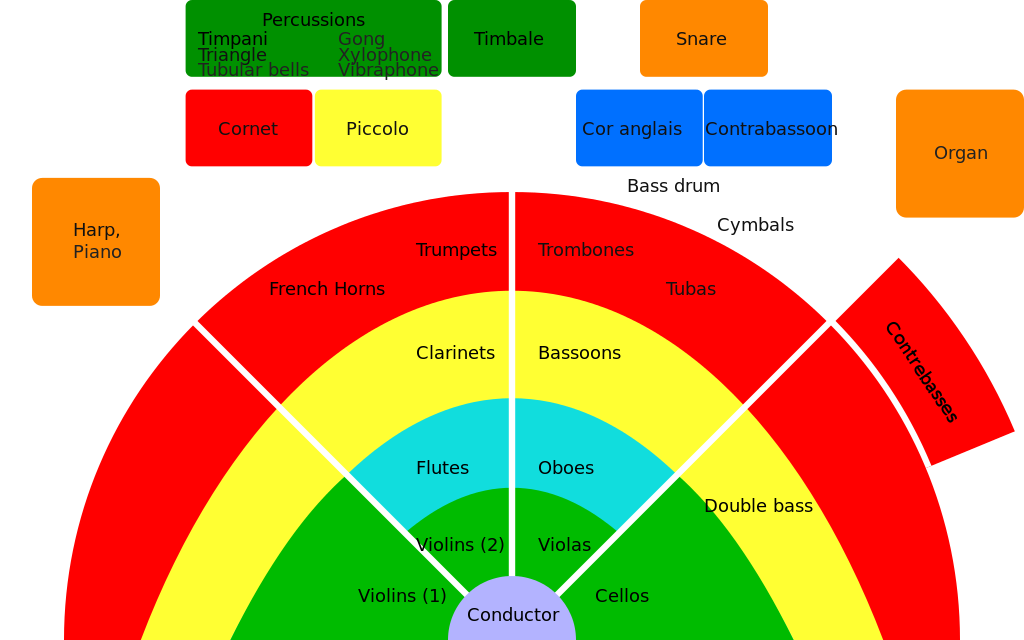
The way you would go about this is to pan the instruments out, so it sounds like they are laying on our left (for example). Like they would in a real orchestra.
This one has caused contention in the composer community.
The reason is that a lot of the samples we buy get recorded and come supplied to us with their “correct” position already ‘baked in’.
The term 'baked in' means that certain aspects of the sound have been captured in the recording. For example, the reverb of a space or the position of an instrument in a room. When these things are recorded and kept in the audio file they are said to have been "baked in".
This means that the violins are already panned left, violas and cellos panned right etc.
So, why do you have to bother?
It’s all in the details. If you take all your samples and make sure they are panned and positioned like the above image then it gives your track more cohesion. Making the different samples sound like they are all playing in the same place.
That’s the idea.
So what you now need to do is to pan each of your instruments in the direction that they would be sitting in a real orchestra.
For example, the Violins (1) would be on the left and Cor Anglais would be on the right.
Add Reverb
This is the number one reason your orchestra sounds too small!
When you record an orchestra you don’t have microphones recording close to the instruments. And you also have microphones recording the room that they are playing in.
This is the trick I was shown by the recording engineer on the project I mentioned above. He took the room recordings and doubled them up, giving them a sense of a larger space.
This is the number one reason your orchestra doesn’t sound as big as it should…
You haven’t thought about the room they are playing in.
What this looks like is taking all the instrument channels of the orchestra and putting a reverb onto that summed group.
This not only gels the samples together but also gives your orchestra a sense of space.
When I learned this trick I started applying it to all my templates and it was amazing.
All you have to do is to add a reverb to each of your instrument groups and adjust your wet/dry signal to sound as you please.
Layer different reverbs
Another thing to think about is that when an orchestra is recorded live they use several microphone setups; close, Decca tree, and ambient.
This way they capture the detail up close, the sound of the ensemble AND the sound of the room.
Each signal has its own unique flavour and you can easily emulate that by choosing a short, medium, and long reverb.
Each one trying to emulate each of those mic setups.
You would create these reverbs as auxiliary sends and then add them subtly to each of your instrument groups.
Remember to keep your reverb subtle and to balance the wet/dry signal.
This was essentially what we did with the orchestral session I produced. We doubled up the reverb channels and layered other samples (rooms) on top.
The effect is to give your samples a sound of space and depth as if you are watching them perform live.
Utilise Modulation and Velocity
This is the first go-to tip in any video or article about making your MIDI sound more realistic and there's a good reason for that.
Modulation, expression and velocity control our sample’s dynamics.
Dynamics are how loud and how quiet an instrument plays and are incredibly important in all music for creating a sense of LIFE.
This then goes back to our first point in this article, ‘imagine what the piece sounds like’.
If you have done this then you will know when and where you want the loud parts to be and where you want the quiet parts to be.
Simple.
All you do now is to program that MIDI data in your DAW; increasing or decreasing velocity and modulation to match what you hear in your mind's ear.
Play Around With Quantization
No matter how good a musician is, their timing and performance will NEVER be 100% in time and in tune.
That is part of the beauty of a performance. The human qualities that each performer brings to the music; the expression, the flow, the emotion.
That’s what you want to create with your orchestral music right?
Right.
That’s where quantising comes in handy.
Using the quantise function in our DAW we can make our MIDI 100% in time and in tune.
AND
We can also make it ever so slightly out of time. Making it more human.
I am not saying you can pass off bad playing for a more “real” performance but what I am saying is that very very slight changes in timing and tuning can bring a certain humanity to your MIDI information.
Try it out. Quantise your notes by about 90-95% and see how you like the sound of it.
It might mean that you have to spend a bit of time manipulating individual notes but sometimes these tiny details make all the difference to a MIDI track.
If I am totally honest I very rarely use this but when I have it has made the world of difference.
Let me tell you why I don’t often do this.
Layer a live recording
When I produce my music I very often layer a live recording on top of the MIDI.
This live performance brings the same life to a track that mucking about with timing (quantising) does.
This is one of my favourite tricks EVER.
The single live instrument tricks your ears into thinking that the whole track is more organic and more human and more real.
It’s so simple and so effective.
What it also does is give your track character. One of the most important aspects of all great music.
You don’t even have to record the whole melody. I often just record loops live. This way I can have more control over the timing of the loop and save myself a bunch of time fixing my bad performance.
I have done this very successfully over the years. You can hear a loop of me playing a four-note cello bassline in the trailer for The Pale Blue Eye.
Don’t let your inability to play the instrument or the lack of decent mics stop you.
That’s the beauty of it, it is just a subtle layer of “reality” and it doesn’t have to be perfect.
Automate
When an orchestra plays, they will play dynamically as a whole.
This is what you are trying to emulate with this tip.
You are automating the volume and filters of the instrument groups that you created earlier.
This automation of the instrument groups gives them their own sense of movement and that movement is integral to the feeling of a real performance.
Again come back to your first imagined idea of the piece and imitate that vision with the volume automation of the group.
If you imagined the strings got louder in the last 30 seconds then automate that. This can simply mean drawing in the volume swells in the automation view on each channel.
Done is better than perfect
This is one of those lessons in life that has a huge impact on the way I work.
I don’t want this post to make you feel like you need to spend hour after hour trying to make your samples sound “perfect”.
DO NOT DO THAT.
When it comes to any creative endeavour, getting the piece finished is more important than chasing perfection.
“Why is that Rich?” I hear you ask.
Because “perfect” is an impossible goal. It is a subjective thing that can change according to how you feel. One day you can think it’s perfect and the next day you will think it sounds rubbish depending on how you are feeling rather than the piece itself.
This is because perfectionism is a sign of insecurity.
I’m not saying you should ignore quality. I am suggesting that you question what it is you are looking for when you have spent 2-3 hours fiddling with automation. Is it really that it isn’t right yet or is it just because you are scared that it/you are not good enough?
Just putting that out there…done is better than perfect.
BONUS TIP!
The #1 Reason Your Orchestra Sounds Unrealistic.
One of the most common pieces of advice I give aspiring composers is this:
“Write for the samples, not for the players”
What this means is that 99% of the time we don’t work with live players we work with samples.
Samples are not the same as a human musician.
If you write your music as if a real musician is going to play it you then tend to overlook the fact that it doesn’t sound real. The samples are trying to sound like a real musician but they just don’t cut it.
Sample libraries are created to be their own instruments with their own quirks and advantages.
Take Spitfire Audio strings for example.
Their legato patches are beautiful BUT they lack any real attack on the notes, they are very ethereal and “filmic”.
When you record with a real string orchestra their legato playing still has an attack on the notes.
So although the Spitfire legato’s sound great, they don’t sound exactly like a real string orchestra.
So if I were to write using those samples I would either layer another sample library with an attack (probably a staccato patch) OR I would write lines that feel ethereal.
I am therefore writing for that library and not for the string section itself.
This is why we all have so many different libraries is it not!?
Each one brings something unique to the table.

Get my FREE Trailer Music Toolkit
It contains all the One-shots you need to sketch a complete track, and the hugely popular Perfect Trailer Music Cue Blueprint PDF.


